Frequently Asked Questions#
Find answers to key questions regarding model usage, functionalities, and troubleshooting to ensure optimal and efficient results.
Note
If you find that you still have unanswered questions, please reach out to us at nci-cmm@mail.nih.gov !
General questions and troubleshooting#
General installation issues
If you encounter problems with installing empanada-napari, try restarting napari or installing the plugin using pip. If you still face difficulties, consider creating a new virtual environment to avoid dependency conflicts. Please check the Issues tab on the empanada-napari GitHub, you may find your error documented there. If not, please create your own issue!
Installing an older version of empanada-napari
In some cases, newer versions of some dependencies may not support your device (e.g. PyTorch and Intel MacOS). If you are experiencing errors installing the latest version, or errors during computation, you can downgrade to empanada-napari 1.2.1:
Create a new virtual environment:
conda create -y -n empanada -c conda-forge python=3.9
Activate the new environment:
conda activate empanada
Install napari 0.4.18 and pyqt with conda:
conda install -c conda-forge napari==0.4.18 pyqt
For alternative and more detailed installation instructions, see the official napari installation tutorial.
From here, install empanada-napari 1.2.1 with pip:
pip install empanada-napari==1.2.1
I’m getting an error saying my Nvidia driver is out of date
If you’re getting a PyTorch error about an out of date Nvidia driver, you can try to update your driver, or downgrade torch and torchvision to versions 2.10.0 and 0.25.0:
pip install --upgrade torch==2.10.0 torchvision==0.25.0
I downloaded empanada and I’m running a model for the first time. Why is it not working?
The first time you choose a model to run inference, empanada has to download the model weights and config from zenodo. Make sure you’re connected to the internet and that you don’t have extra SSL certificate requirements (sometimes imposed by institutional IT - go to Guest wifi!). Check terminal, most likely it’s a slow download.
Why is module X (e.g. remove boundaries) taking so long?
If you are trying to run empanada on your laptop on a massive image, it will be slow because of resource limitations. It is possible to run empanada on HPC resources, but you will need local IT and compute help for this, see volume-em/empanada-napari Some libraries are just not very efficient; for example, remove boundaries will take a long time in 2D and 3D. This is not an empanada issue, but in the future we will try to get more efficient solutions.
Why can’t I undo? Or change panel width (and other UI annoyances)?
Empanada piggybacks on napari; undo is not possible now for a variety of reasons that are not in our control. Also for the GUI, issues have to wait for upgrades from napari. We will do our best to keep up to date, while also limiting the number of versions we push out.
Installation steps to ensure efficient processing on GPU enabled Windows systems
Important
If you have a Windows system with GPUs, it is critical to ensure that PyTorch is installed with compatible cuda libraries. See step 4
If you’ve previously installed and used conda, you will need to create a new virtual environment in order to avoid dependency conflicts:
conda create -y -n empanada -c conda-forge python=3.9
conda activate empanada
Install pyqt with conda:
conda install pyqt
Install napari with pip:
pip install "napari[all]"
Install pytorch using conda:
conda install pytorch torchvision torchaudio pytorch-cuda=11.8 -c pytorch -c nvidia
Install empanada-napari using pip:
pip install empanada-napari=1.2
What are the hardware requirements to use empanada-napari?
Empanada-napari can run inference, finetuning, and training modules on GPU and CPU. Though running these processes strictly on CPU will require more time.
Other hardware requirements include:
Operating System: Mac, Linux, or Windows
Python Version: Supported versions are Python 3.9 and below. Later versions (i.e., Python 3.10) are not supported.
GPU Support: Having a GPU installed on your system will significantly increase model throughput, although CPU optimized versions of all models are shipped with the plugin. The plugin relies on pytorch for running models, and GPU drivers must be correctly installed for GPU usage.
Note
Windows users, please see above section regarding installations steps for systems with GPU.
Memory: Ensure sufficient memory to handle the processing requirements of deep learning-based image segmentation tasks. 32G should be sufficient.
Storage: Adequate storage space to store datasets, models, and any intermediate results generated during inference or training. 256G should be sufficient.
Why are my denoised images giving me worse results?
MitoNet was trained on images from CEM1.5M that were denoised with histogram equalization, while techniques like noise2void use a distinct denoising method. This variance in denoising techniques causes a significant shift in the characteristics of the data, leading to subpar outcomes when applying MitoNet to denoised images.
Proofreading questions#
Can I undo a proofreading function (i.e., merge, split, morph labels)?
Unfortunately, empanada-napari does not have an undo button. When proofreading or editing segmentations, it is recommended to first duplicate the labels layer in napari. This ensures that you have a reference point and can easily revert to the original if needed.
Tip
You can change the name of the labels layer by double clicking the layer and entering in a new name. This can help you keep track of the changes being made at that time and reduce the need to start over if you accidentally delete a label.
It is also recommended to periodically export segmentations during the proofreading process. This practice minimizes the risk of data loss in case napari crashes unexpectedly, allowing you to resume from the last saved point.
I want to add a new object instance in the labels layer, how do I know what label ID to assign?
There are a few ways to determine available label IDs within the labels layer:
Use the Count Labels module to get the list of already assigned label IDs. Then change the label value in the napari layer controls (see below) and paint in the new instance.
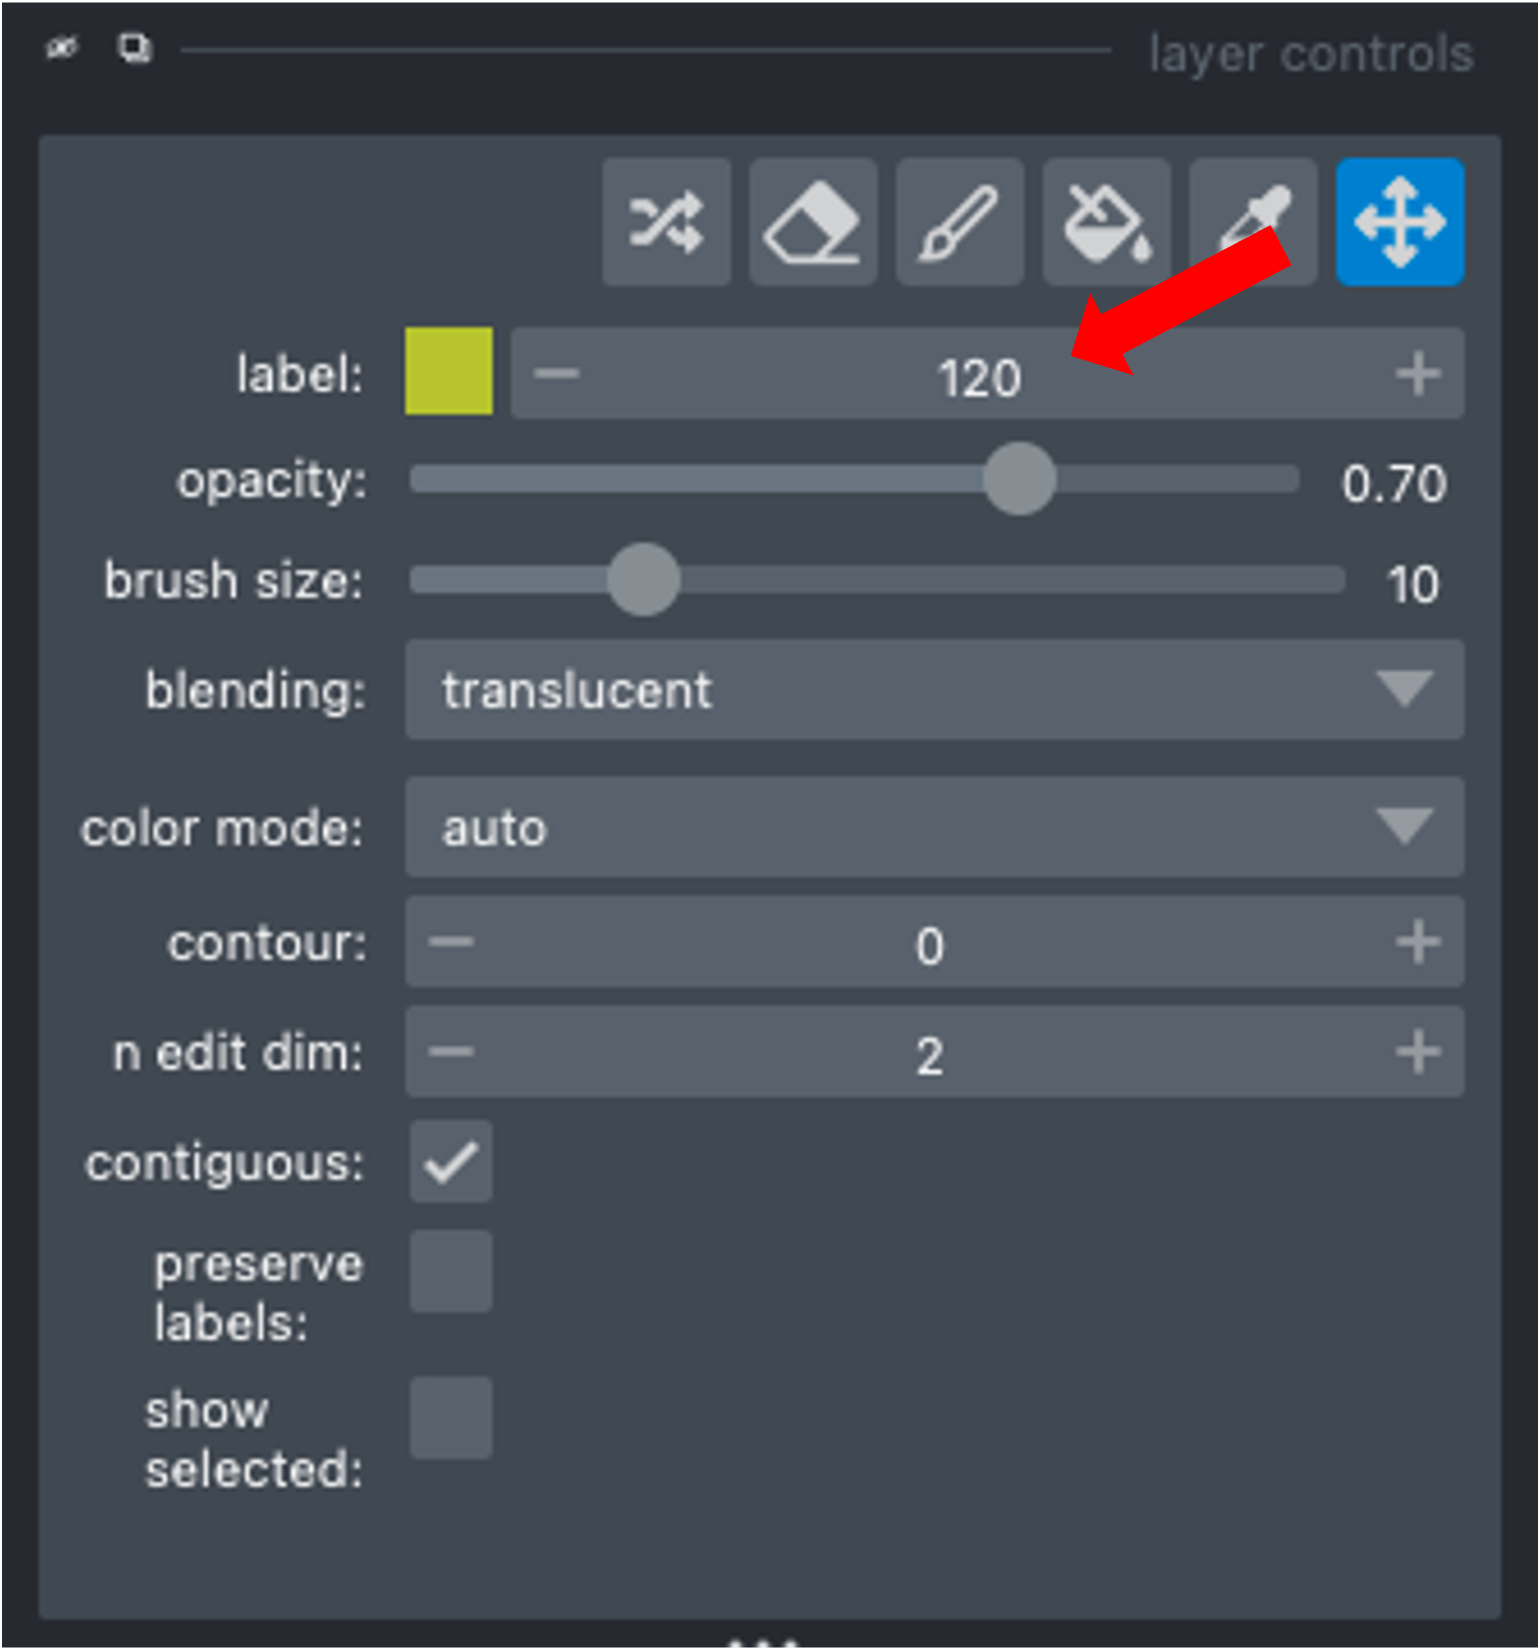
Use the Find next available label module to adjust the napari painter to either append the current list of label IDs (e.g., you have deleted a previous label ID and can now add a new instance with the available label ID) or to add max_label ID + 1.
How can I view one object/instance at a time?
In the napari layer control panel, select the label ID you wish to view. Then select the option to show selected.
Training and finetuning questions#
What is the correct file structure needed to finetune and train a model?
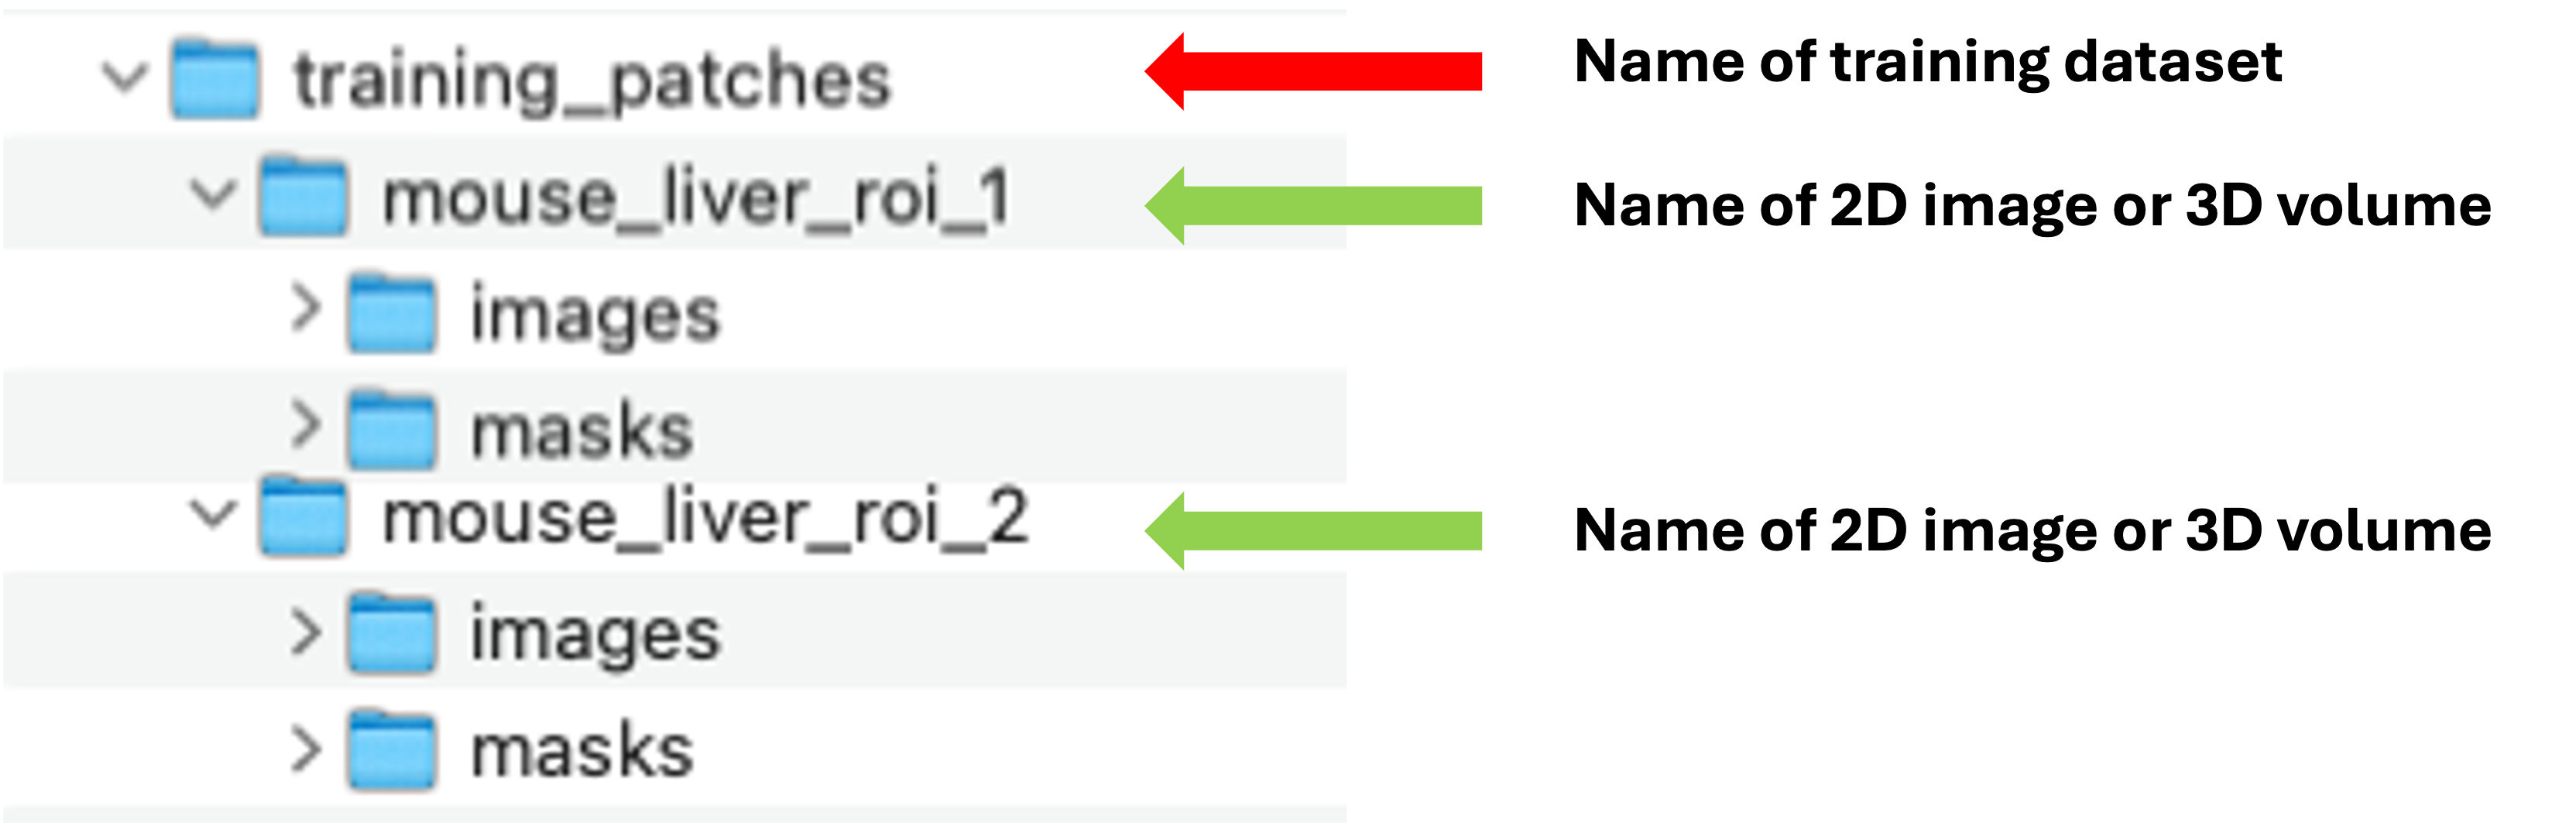
There can be multiple name_of_2D_image_or_3D_volume subdirectories. Each must have a subdirectory called images and another called masks. Corresponding image and mask .tiff files must have identical names but reside in the appropriate folder.
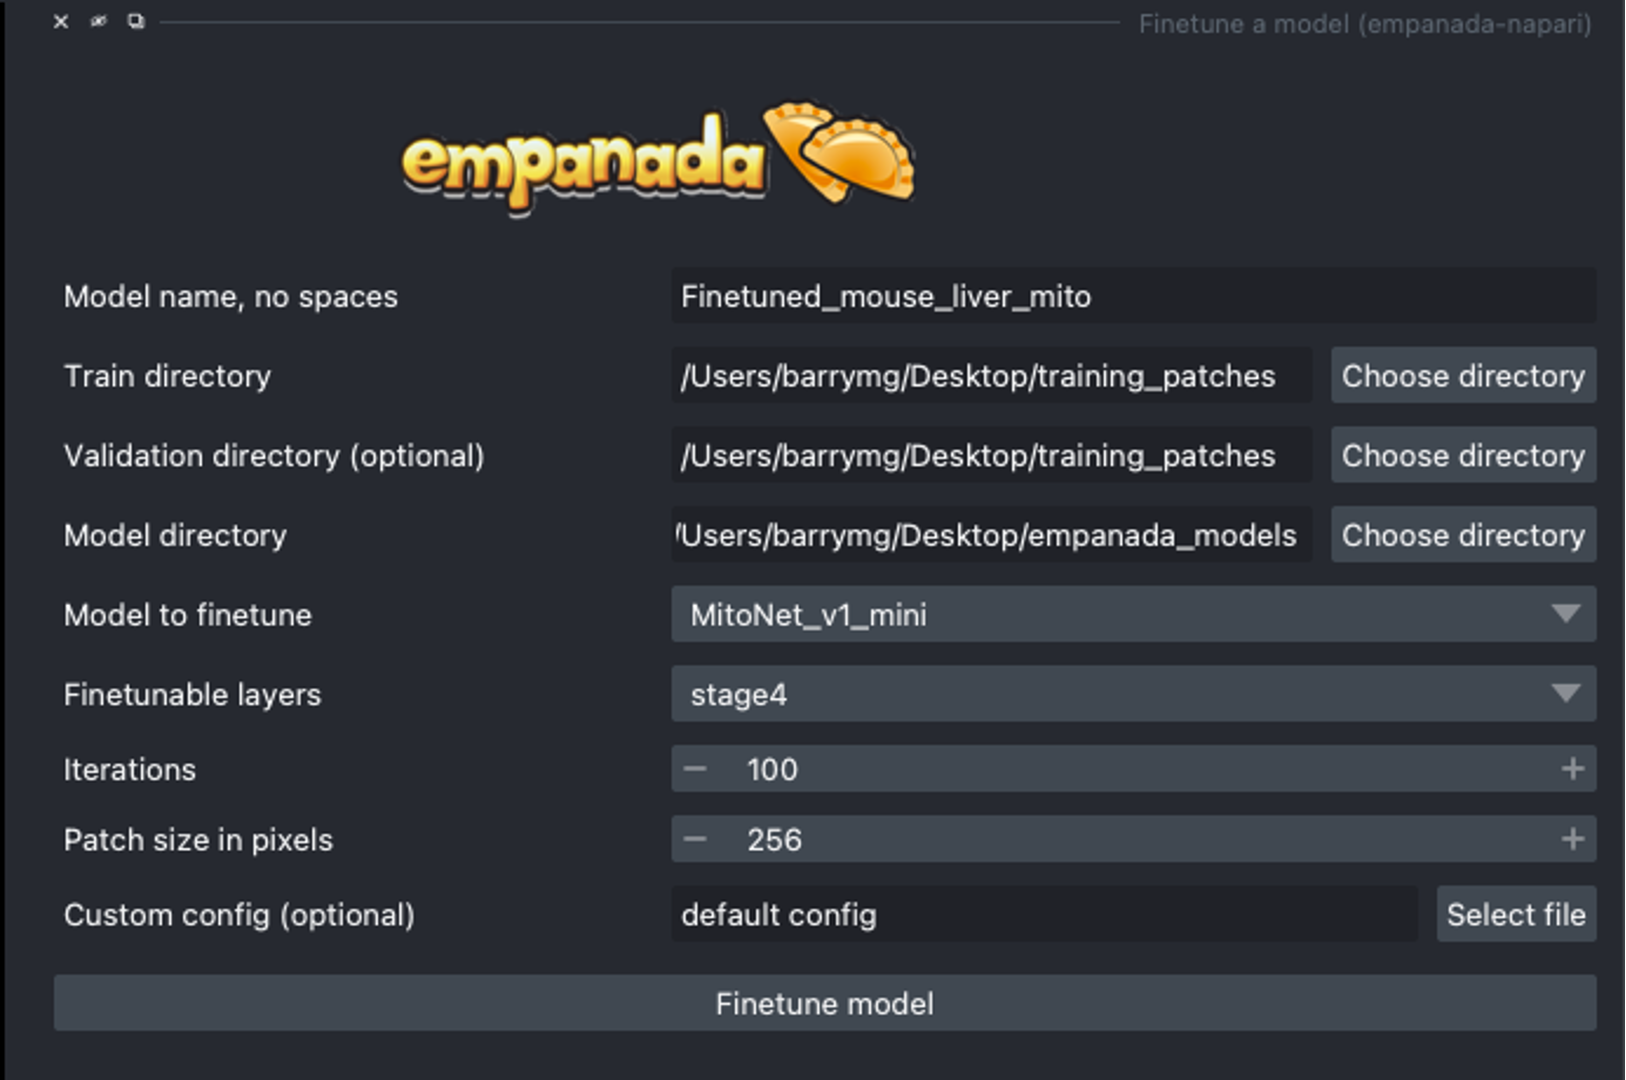
When finetuning a model, what finetunable layers should I select?
When selecting which layers to finetune or unfreeze, consider the following options:
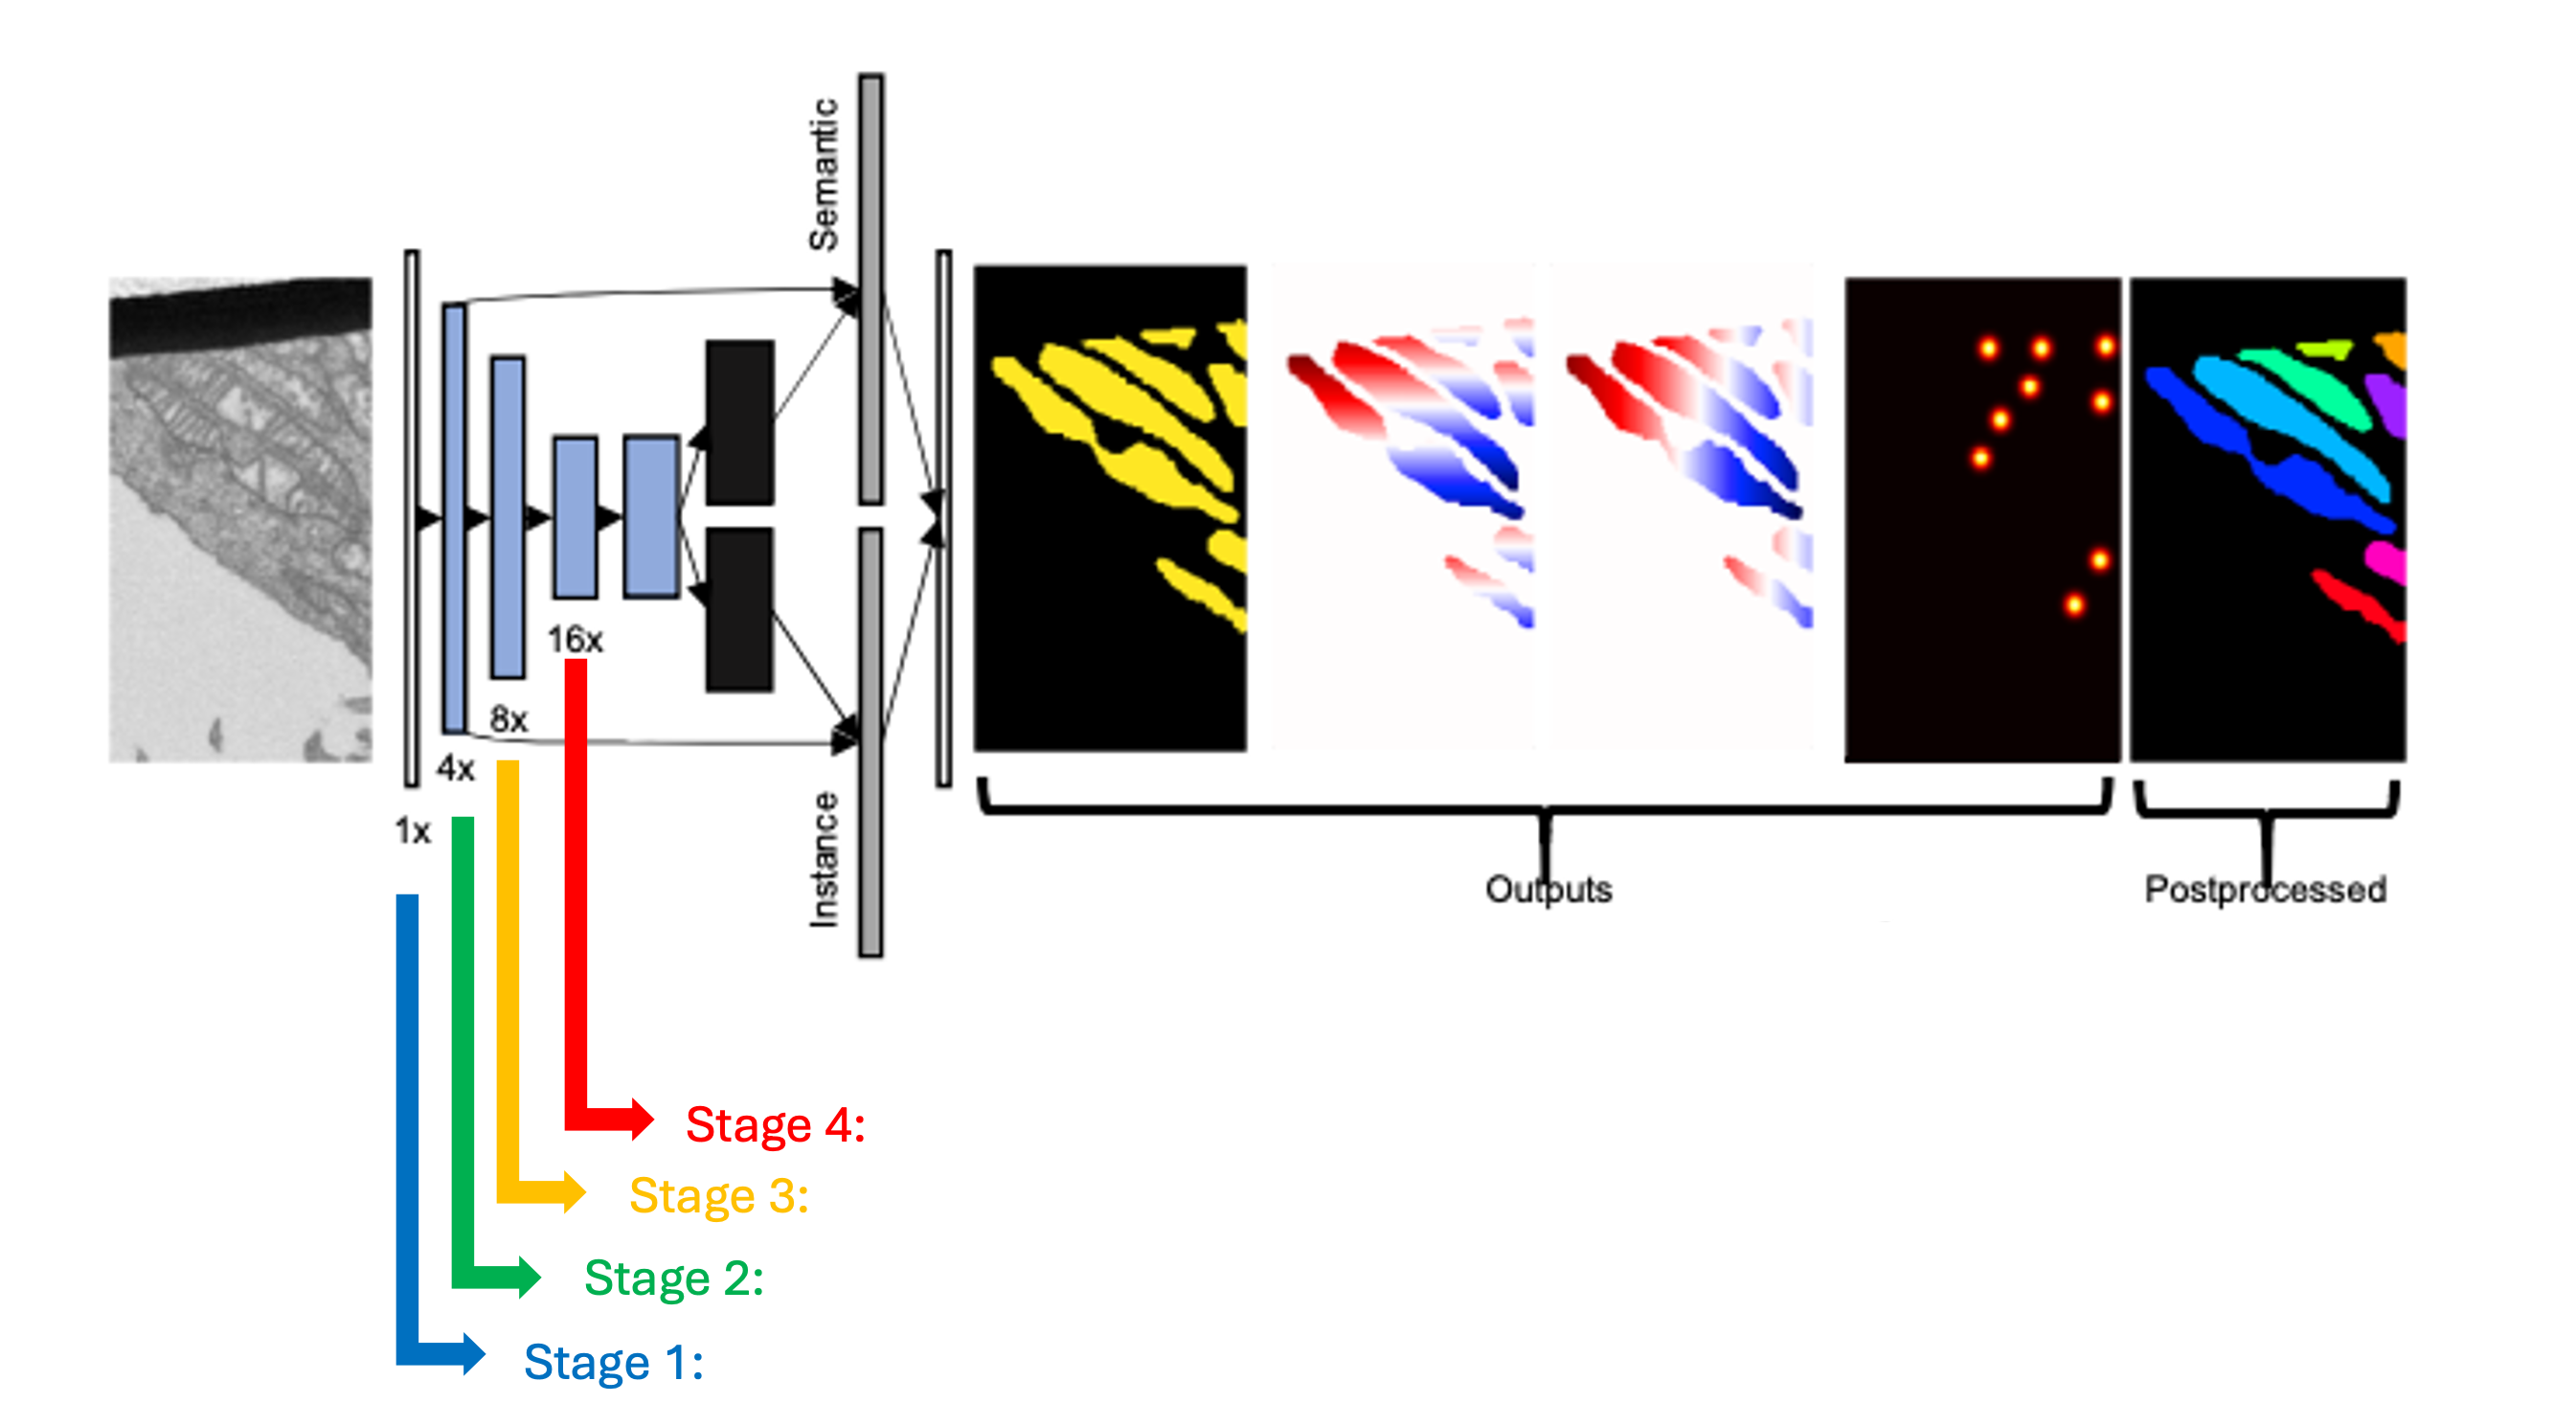
None : Select this option if the model did fairly well during the initial inference on your data.
Stages 1 - 4 : Select between these options depending on how well the model did on the initial inference.
All : Select this option if the model did not perform well on your data. This option will take more time but could offer better results depending on your specific task.
Tip
Experiment with different combinations of frozen and unfrozen layers to observe how it affects model performance. This iterative process can help determine the optimal configuration for your specific task. See Finetuning and Training best practices for more information.
How do I determine the number of iterations needed to train a new model?
When training a new model, determining the number of iterations involves a process of testing and optimization. Here are the steps to help you determine the appropriate number of iterations:
Start with a baseline:
A good starting point is around 100 training iterations.
Increasing the number of iterations gradually can help improve the model’s performance.
Optimization:
For a general model like MitoNet, training for more than 500 iterations is usually not necessary unless dealing with a large number of annotated images.
It is recommended to avoid training for more than 10,000 iterations to prevent overfitting.
Finetuning:
Finetuning a model may require different iteration numbers based on the dataset and specific requirements.
If your current dataset is more similar to that of the training dataset, few iterations are needed.
Model Evaluation:
After training, run inference to evaluate the model’s performance to determine if further iterations are needed.
If you find that further finetuning is required, try selecting patches with the Pick finetuning/training patches module of the area the model is struggling with.
Note
Determining the number of iterations can vary depending on the complexity of the training data and the segmentation task. While the above steps can work as as a great starting point, it is recommended to try different configurations to determine the “sweet spot” for your model.
How to determine a model’s accuracy on your dataset?
To calculate a model’s accuracy on your data follow the steps below:
Run an initial 2D or 3D inference on your dataset.
Next, use the Pick finetune/training patches module to create patches/flipbooks.
Save the initial output from the model using the Save finetune/training patches module.
After saving the unedited patches, now apply any proofreading/corrections needed.
Hint
Keep in mind for 3D images, the patches are output as flipbooks (short stacks of 5 images). Only the middle (or third image) in each flipbook should be annotated (or in this case proofread), the other images are there to provide some 3D context. At the bottom of the viewer you’ll see that there are two sliders. The top one scrolls through the stack of images and the bottom one scrolls through the flipbooks. Make sure all edits to annotations are made on slice “2” of the top slider.
Once all the corrections have been made, use the Save finetune/training patches module again to save the corrected patches.
Now that you have the initial and corrected segmentations saved, calculate the IoU (intersection-over-union) and/or F1 scores.
How do I remove a model?
Warning
It is not recommended to delete any other files from this folder besides any user created finetuned model!
To remove an unwanted model that you have either finetuned or trained within empanada-napari:
Go to your files and search for the .empanada folder.
In the config folder you will then find the user created finetuned models.
Select the user created model you wish to delete and delete.
You will need to relaunch napari and empanada-napari to see the changes.
Can I use MitoNet outside of the empanada-napari plugin?
MitoNet is intended for use exclusively within the napari environment through the empanada-napari plugin. This design choice maximizes the model’s effectiveness and ensures that users can take full advantage of napari’s capabilities for their segmentation tasks as well as the proofreading tools developed in the empanada-napari plugin.